How to make a Raspberry Pi Home Air Quality Monitor
See what’s in the air in your house.
I’ve been more concerned about the quality of air in my house recently. I’ll soon be paying for a service to clean the furnace and duct work, and I wanted a way to determine if there’s been any measurable impact or change. Fortunately, using a SDS011 sensor, a Raspberry Pi and a bit of software, I can create a simple home air quality monitor. Here’s how to do it.
What You’ll Need For This Project
- Raspberry Pi 4 or Raspberry Pi 3 with power adapter
- 8 GB (or larger) microSD card with Raspberry Pi OS. See our list of best microSD cards for Raspberry Pi.
- SDS011 sensor
- A small block of wood for mounting the pi and sensor (optional)
- Hot glue for mounting the pi and sensor (optional)
How to Make a Raspberry Pi Home Air Quality Monitor
Before you get started, make sure that you have your Raspberry Pi OS set up. If you haven’t done this before, see our article on how to set up a Raspberry Pi for the first time or how to do a headless Raspberry Pi install (without the keyboard and screen).
1. Install git, which will allow us to clone the code from github.com
sudo apt-get update && sudo apt-get install -y git
2. Clone the repository with example code. This code takes care of communication with the sensor, and sets up a simple server for monitoring on your home network.
cd ~/
git clone https://github.com/rydercalmdown/pi_air_quality_monitor.git
3. Run the installation command after descending into the repository. This will take care of installing all base dependencies, like Docker and Docker Compose to make this project run.
cd pi_air_quality_monitor
make install
4. Run the build command to build the docker images. This may take a bit of time depending on your Raspberry Pi.
make build
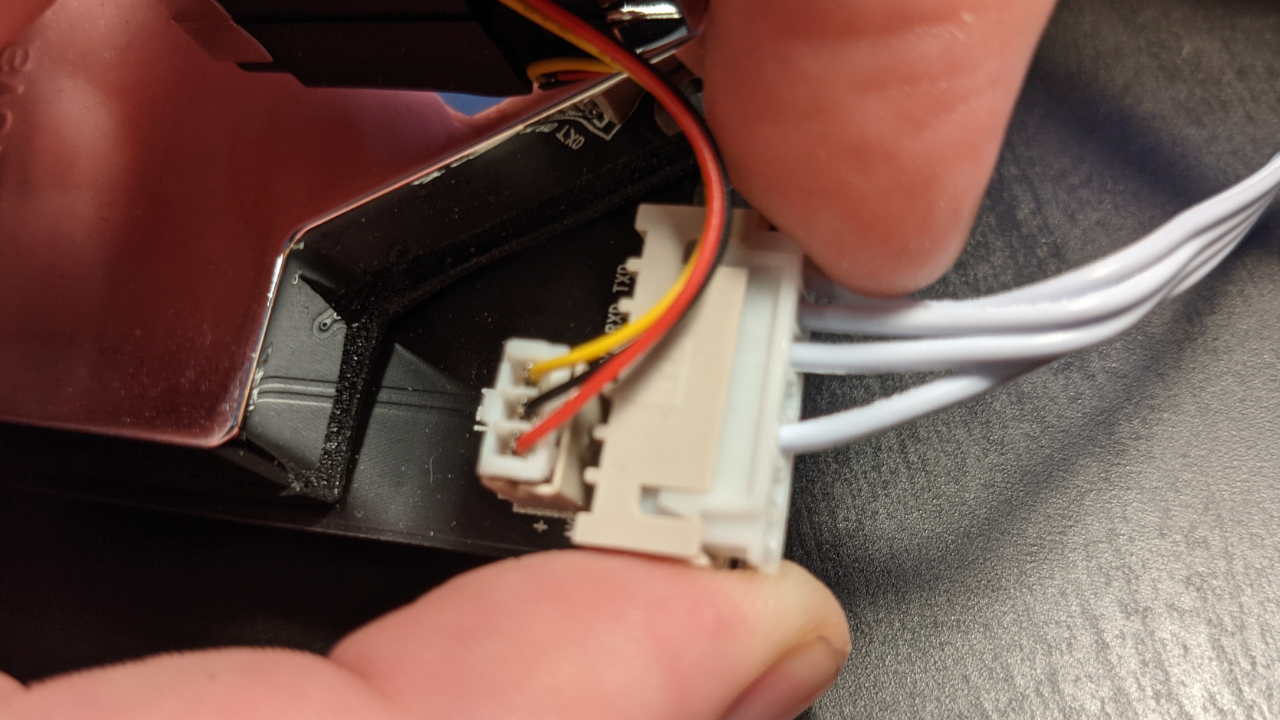
5. Connect the SDS011 sensor to the USB adapter it comes with using the provided jumper cable.
Get Tom's Hardware's best news and in-depth reviews, straight to your inbox.
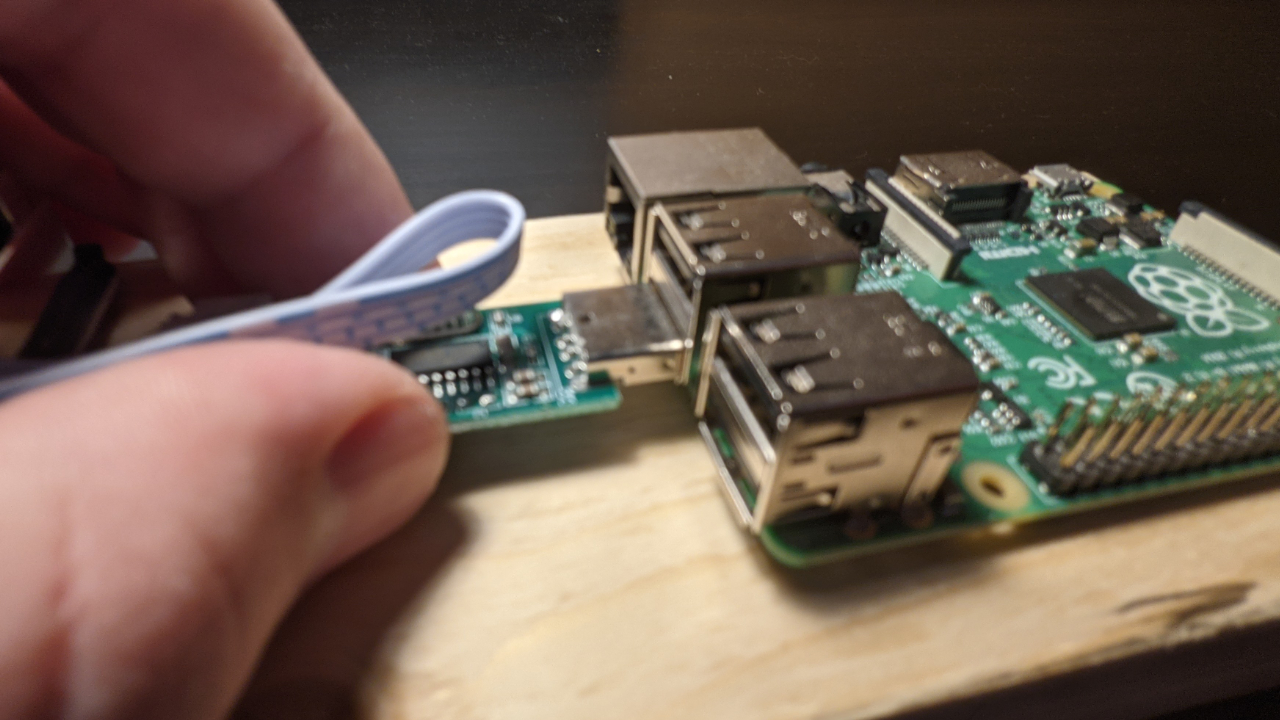
6. Connect the SDS011 USB adapter to your Raspberry Pi. You may see a flashing red light, but if not, don’t worry.
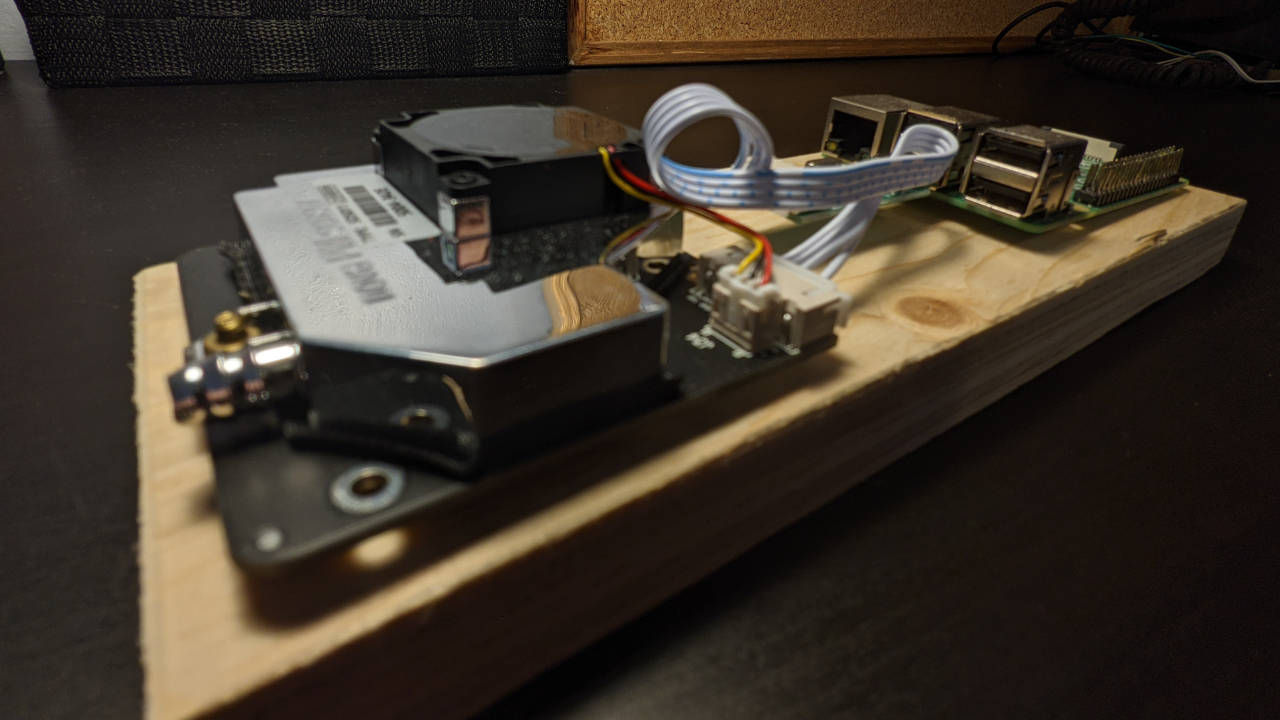
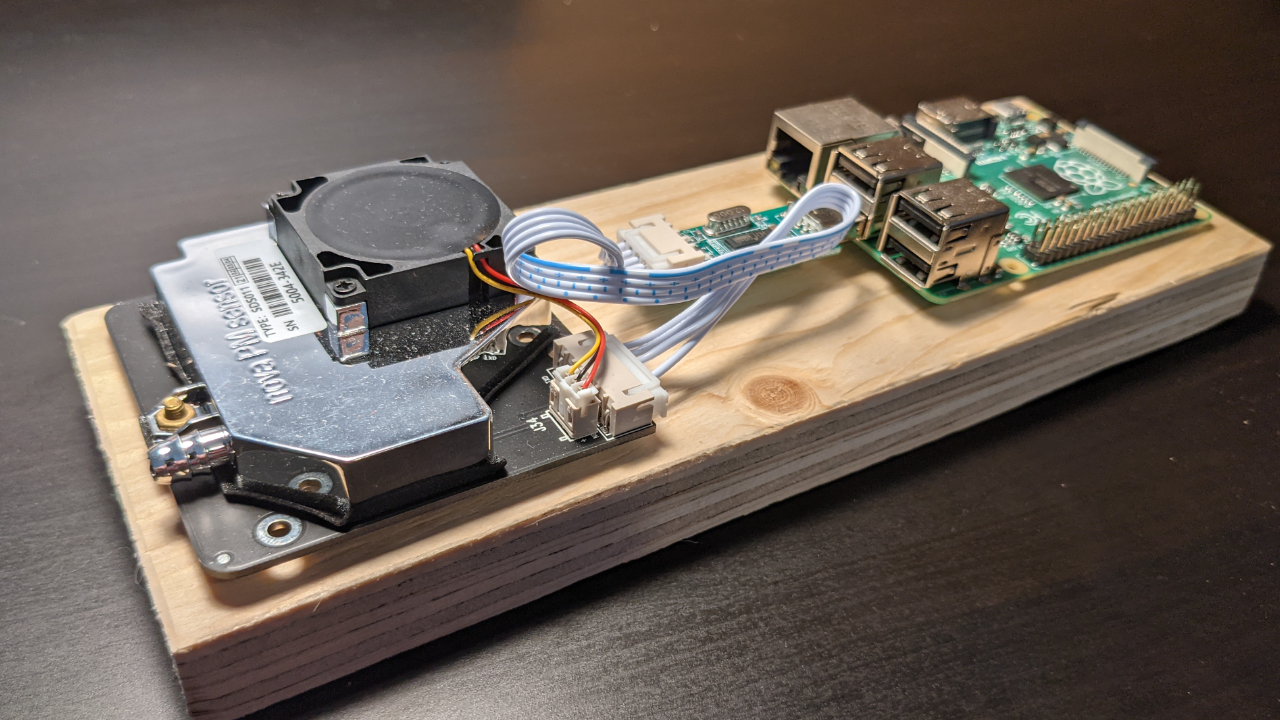
7. Mount the SDS011 sensor and your Raspberry Pi to a small block of wood. This step is optional, you can also use a case, but I like the open air look of the system. If mounting the sensor inside a component, make sure the air inlet port is connected to the outside of the case.
8. Run the server to start taking measurements.
make run
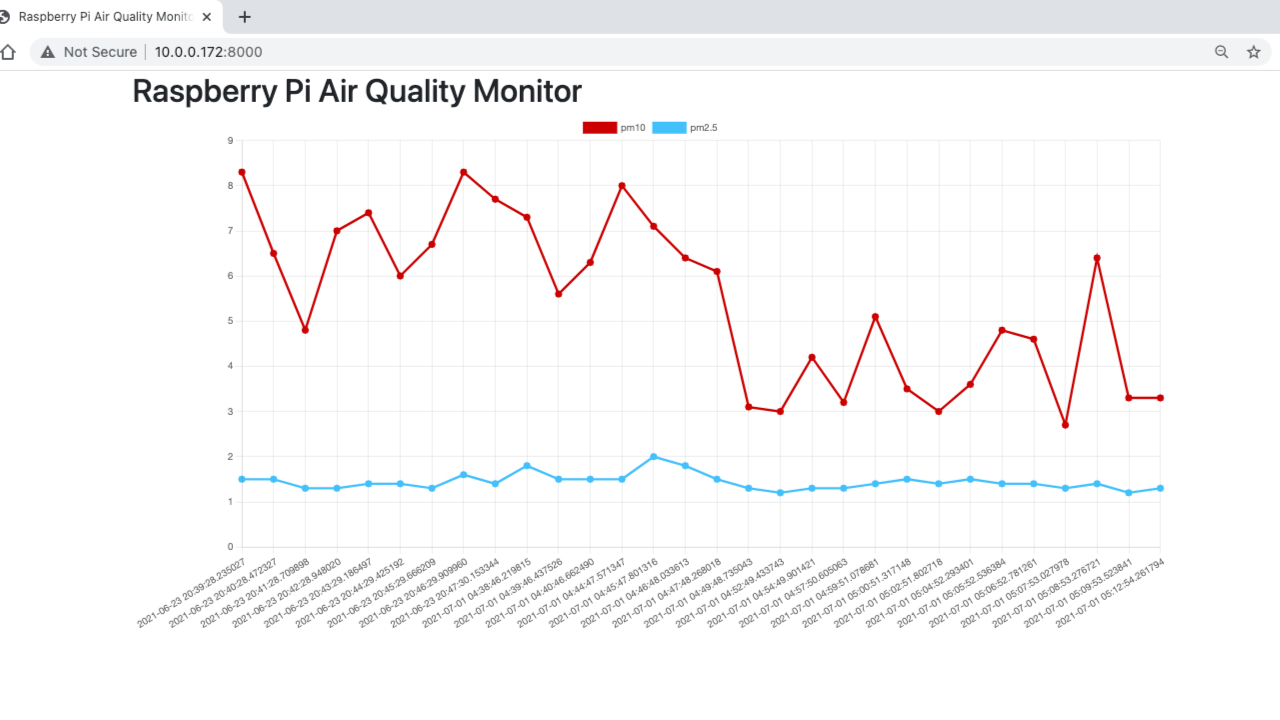
9. Navigate to your Pi’s IP address on port 8000 to view the web server, and a small graph of recent measurements of air quality. You’ll see a graph.
The sensor in this Raspberry Pi Project measures two metrics: PM2.5 and PM10. PM stands for particulate matter and the number after is the amount of micrometers, 2.5 or 10. Particles of PM2.5 are particularly bad for your health if they contain toxic substances.
This server shows running measurements for the last 30 minutes, but could be easily adapted to do more. I’ll be comparing my values from now until after my HVAC system is cleaned, and hopefully I’ll see a measurable difference. After that, I’ll be putting this in a water proof box to measure air quality outside, to give me an idea of how it varies over time.

Ryder Damer is a Freelance Writer for Tom's Hardware US covering Raspberry Pi projects and tutorials.
-
Psyrick Hi!Reply
Thanks so much for this guide! I am a complete newbie and found this very easy to follow.
I have followed the instructions as posted but can't make it run well.
When opening the browser to view the page, this is what appears:
This site can’t be reached192.168.10.165 refused to connect.
then I get this from the Windows command prompt:
web_1 | Traceback (most recent call last):
web_1 | File "app.py", line 15, in <module>
web_1 | aqm = AirQualityMonitor()
web_1 | File "/code/AirQualityMonitor.py", line 13, in initweb_1 | self.sds = SDS011(port='/dev/ttyUSB0')
web_1 | File "/usr/local/lib/python3.8/site-packages/sds011/sds011.py", line 132, in initweb_1 | self.probe()
web_1 | File "/usr/local/lib/python3.8/site-packages/sds011/sds011.py", line 139, in probe
web_1 | firmware_version_data = self.get_firmware_version()
web_1 | File "/usr/local/lib/python3.8/site-packages/sds011/sds011.py", line 226, in get_firmware_version
web_1 | return self.request(cmd)
web_1 | File "/usr/local/lib/python3.8/site-packages/sds011/sds011.py", line 234, in request
web_1 | resp = self.rx_cmd_resp_queue.get(timeout=10)
web_1 | File "/usr/local/lib/python3.8/queue.py", line 178, in get
web_1 | raise Empty
web_1 | _queue.Empty
I am using an old Raspberry Pi (2011.12) and have installed the latest Raspbian OS.
I am hoping that you can help me out. -
NJAir I'm having the same issue - currently running Raspberry Pi 3 (B+) - not headless. Can't navigate to IP address as per the last instruction in the tutorial. Sorry, I'm a noob! Any help would be appreciated. Would love to see the air quality readings!Reply
Psyrick said:Hi!
Thanks so much for this guide! I am a complete newbie and found this very easy to follow.
I have followed the instructions as posted but can't make it run well.
When opening the browser to view the page, this is what appears:
This site can’t be reached192.168.10.165 refused to connect.
then I get this from the Windows command prompt:
web_1 | Traceback (most recent call last):
web_1 | File "app.py", line 15, in <module>
web_1 | aqm = AirQualityMonitor()
web_1 | File "/code/AirQualityMonitor.py", line 13, in initweb_1 | self.sds = SDS011(port='/dev/ttyUSB0')
web_1 | File "/usr/local/lib/python3.8/site-packages/sds011/sds011.py", line 132, in initweb_1 | self.probe()
web_1 | File "/usr/local/lib/python3.8/site-packages/sds011/sds011.py", line 139, in probe
web_1 | firmware_version_data = self.get_firmware_version()
web_1 | File "/usr/local/lib/python3.8/site-packages/sds011/sds011.py", line 226, in get_firmware_version
web_1 | return self.request(cmd)
web_1 | File "/usr/local/lib/python3.8/site-packages/sds011/sds011.py", line 234, in request
web_1 | resp = self.rx_cmd_resp_queue.get(timeout=10)
web_1 | File "/usr/local/lib/python3.8/queue.py", line 178, in get
web_1 | raise Empty
web_1 | _queue.Empty
I am using an old Raspberry Pi (2011.12) and have installed the latest Raspbian OS.
I am hoping that you can help me out. -
NJAir ReplyPsyrick said:Hi!
Thanks so much for this guide! I am a complete newbie and found this very easy to follow.
I have followed the instructions as posted but can't make it run well.
When opening the browser to view the page, this is what appears:
This site can’t be reached192.168.10.165 refused to connect.
then I get this from the Windows command prompt:
web_1 | Traceback (most recent call last):
web_1 | File "app.py", line 15, in <module>
web_1 | aqm = AirQualityMonitor()
web_1 | File "/code/AirQualityMonitor.py", line 13, in initweb_1 | self.sds = SDS011(port='/dev/ttyUSB0')
web_1 | File "/usr/local/lib/python3.8/site-packages/sds011/sds011.py", line 132, in initweb_1 | self.probe()
web_1 | File "/usr/local/lib/python3.8/site-packages/sds011/sds011.py", line 139, in probe
web_1 | firmware_version_data = self.get_firmware_version()
web_1 | File "/usr/local/lib/python3.8/site-packages/sds011/sds011.py", line 226, in get_firmware_version
web_1 | return self.request(cmd)
web_1 | File "/usr/local/lib/python3.8/site-packages/sds011/sds011.py", line 234, in request
web_1 | resp = self.rx_cmd_resp_queue.get(timeout=10)
web_1 | File "/usr/local/lib/python3.8/queue.py", line 178, in get
web_1 | raise Empty
web_1 | _queue.Empty
I am using an old Raspberry Pi (2011.12) and have installed the latest Raspbian OS.
I am hoping that you can help me out.
I figured it out - this is an issue that was discussed on Github: https://github.com/rydercalmdown/pi_air_quality_monitor/issues
You have to change the code in a file called "index" to point to your pi's IP address (or removed the IP address entirely and use /api/ instead - that worked for me).
Also, you have to close and restart the script ("make run") a couple of times before it runs correctly.
Eventually this will all work, and you'll be able to navigate to your pi's IP address (port 8000) to see the data. -
Psyrick ReplyNJAir said:I figured it out - this is an issue that was discussed on Github: https://github.com/rydercalmdown/pi_air_quality_monitor/issues
You have to change the code in a file called "index" to point to your pi's IP address (or removed the IP address entirely and use /api/ instead - that worked for me).
Also, you have to close and restart the script ("make run") a couple of times before it runs correctly.
Eventually this will all work, and you'll be able to navigate to your pi's IP address (port 8000) to see the data.
Glad that worked out for you. I have done those indicated at the link but I am still having the same errors as before... Decided to just try running different code instead - apparently plenty available in other sites.
I hope that the people who decided to post this tried to run the code first though 🤷♂️ -
NJAir ReplyPsyrick said:Glad that worked out for you. I have done those indicated at the link but I am still having the same errors as before... Decided to just try running different code instead - apparently plenty available in other sites.
I hope that the people who decided to post this tried to run the code first though 🤷♂️
Yes - plenty available elsewhere. Just finished one version using Adafruit IO and it was relatively trouble free. Enjoying putting these things together! -
Psyrick Are you talking about the one from the Raspberry Pi Blog? Yeah, that does look good. Would you mind sharing where I can learn how use Adafruit? I am a total beginner at this and have no idea how to setup Adafruit...Reply -
Friiiitzzz Hey,Reply
When I wanted to make the program going I got an error at the make build step.
ERROR: Exception:
Traceback (most recent call last):
File "/usr/local/lib/python3.8/tarfile.py", line 2292, in utime
os.utime(targetpath, (tarinfo.mtime, tarinfo.mtime))
PermissionError: Operation not permitted
During handling of the above exception, another exception occurred:
Traceback (most recent call last):
File "/usr/local/lib/python3.8/site-packages/pip/_internal/cli/base_command.py", line 167, in exc_logging_wrapper
status = run_func(*args)
File "/usr/local/lib/python3.8/site-packages/pip/_internal/cli/req_command.py", line 205, in wrapper
return func(self, options, args)
File "/usr/local/lib/python3.8/site-packages/pip/_internal/commands/install.py", line 339, in run
requirement_set = resolver.resolve(
File "/usr/local/lib/python3.8/site-packages/pip/_internal/resolution/resolvelib/resolver.py", line 94, in resolve
result = self._result = resolver.resolve(
File "/usr/local/lib/python3.8/site-packages/pip/_vendor/resolvelib/resolvers.py", line 481, in resolve
state = resolution.resolve(requirements, max_rounds=max_rounds)
File "/usr/local/lib/python3.8/site-packages/pip/_vendor/resolvelib/resolvers.py", line 373, in resolve
failure_causes = self._attempt_to_pin_criterion(name)
File "/usr/local/lib/python3.8/site-packages/pip/_vendor/resolvelib/resolvers.py", line 213, in _attempt_to_pin_criterion
criteria = self._get_updated_criteria(candidate)
File "/usr/local/lib/python3.8/site-packages/pip/_vendor/resolvelib/resolvers.py", line 204, in _get_updated_criteria
self._add_to_criteria(criteria, requirement, parent=candidate)
File "/usr/local/lib/python3.8/site-packages/pip/_vendor/resolvelib/resolvers.py", line 172, in _add_to_criteria
if not criterion.candidates:
File "/usr/local/lib/python3.8/site-packages/pip/vendor/resolvelib/structs.py", line 151, in __bool_ return bool(self._sequence)
File "/usr/local/lib/python3.8/site-packages/pip/internal/resolution/resolvelib/found_candidates.py", line 155, in __bool_ return any(self)
File "/usr/local/lib/python3.8/site-packages/pip/_internal/resolution/resolvelib/found_candidates.py", line 143, in <genexpr>
return (c for c in iterator if id(c) not in self._incompatible_ids)
File "/usr/local/lib/python3.8/site-packages/pip/_internal/resolution/resolvelib/found_candidates.py", line 47, in _iter_built
candidate = func()
File "/usr/local/lib/python3.8/site-packages/pip/_internal/resolution/resolvelib/factory.py", line 215, in _make_candidate_from_link
self._link_candidate_cache = LinkCandidate(
File "/usr/local/lib/python3.8/site-packages/pip/internal/resolution/resolvelib/candidates.py", line 288, in __init_ super().init(
File "/usr/local/lib/python3.8/site-packages/pip/internal/resolution/resolvelib/candidates.py", line 158, in __init_ self.dist = self._prepare()
File "/usr/local/lib/python3.8/site-packages/pip/_internal/resolution/resolvelib/candidates.py", line 227, in _prepare
dist = self._prepare_distribution()
File "/usr/local/lib/python3.8/site-packages/pip/_internal/resolution/resolvelib/candidates.py", line 299, in _prepare_distribution
return preparer.prepare_linked_requirement(self._ireq, parallel_builds=True)
File "/usr/local/lib/python3.8/site-packages/pip/_internal/operations/prepare.py", line 487, in prepare_linked_requirement
return self._prepare_linked_requirement(req, parallel_builds)
File "/usr/local/lib/python3.8/site-packages/pip/_internal/operations/prepare.py", line 532, in _prepare_linked_requirement
local_file = unpack_url(
File "/usr/local/lib/python3.8/site-packages/pip/_internal/operations/prepare.py", line 224, in unpack_url
unpack_file(file.path, location, file.content_type)
File "/usr/local/lib/python3.8/site-packages/pip/_internal/utils/unpacking.py", line 247, in unpack_file
untar_file(filename, location)
File "/usr/local/lib/python3.8/site-packages/pip/_internal/utils/unpacking.py", line 222, in untar_file
tar.utime(member, path)
File "/usr/local/lib/python3.8/tarfile.py", line 2294, in utime
raise ExtractError("could not change modification time")
tarfile.ExtractError: could not change modification time
WARNING: You are using pip version 22.0.4; however, version 22.1.2 is available.
You should consider upgrading via the '/usr/local/bin/python -m pip install --upgrade pip' command.
The command '/bin/sh -c pip install -r requirements.txt' returned a non-zero code: 2
ERROR: Service 'web' failed to build : Build failed
make: *** Error 1
Can anyone help me? That would be awesome I'm a complete newbie.
