13 Common Security Mistakes That Make Your PC Vulnerable
Avoid these pitfalls to keep your Windows computer and home network safe.
We live in a world where we are digitally connected nearly 24/7. Even when we are not actually using our devices for work or paying bills or socializing with those we know, we can still be logged in permanently to our various online accounts.
This means that we are each exposed to cyber criminals on a constant and neverending basis, who can inflict catastrophic results upon us if we are not too careful.
Unfortunately, too many people go about their lives believing that they are not truly at risk. This is largely because while people may be fully aware of how governments, corporations, and organizations are often the victims of cyberattacks, that they themselves are not vulnerable on an individual level.
But the truth is that your personal information is incredibly valuable to cybercriminals because they can sell it for a good profit. Ultimately, it’s your responsibility to protect your personal information against attack, and that starts with securing your PC.
Here are the thirteen most common security mistakes that can make your PC vulnerable, and how you can solve each of them:
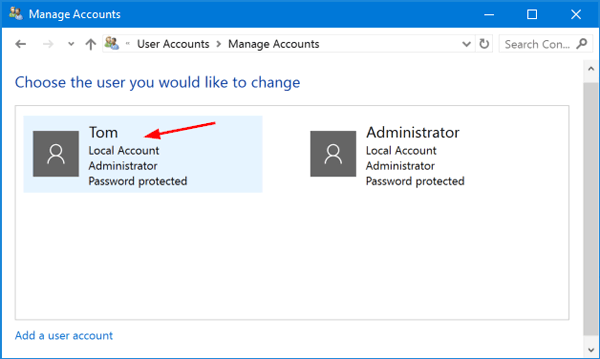
1. Failing to Change Your Windows Password
This is the very first thing you should do on a new PC because the default password on a new PC (sometimes none) makes it ridiculously easy for a hacker to get in. And, if you already have a password on your local or Microsoft account, make sure it’s a strong password.
Even if you don’t remember what the admin password is, you can still remove and change it in a rather simple way on Windows 10 for your PC:
Get Tom's Hardware's best news and in-depth reviews, straight to your inbox.
- Select Settings from the Windows Start Menu.
- Click Accounts.
- Click Your Info.
- Click Manage My Microsoft Account.
- Click More Actions.
- Click Edit Profile.
- Proceed to change your password.
- Restart the computer and sign in with your new password.
2. Failing to Change the Access Password
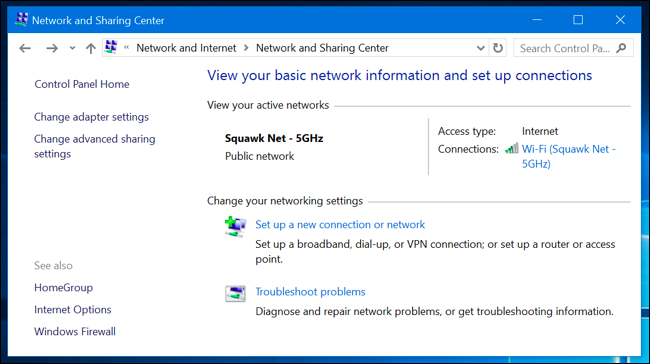
One more password that you should change immediately is the access password, or the password to your home Wi-Fi network that you connect your PC to on a daily basis. If anything, this could be an even more important password to change than your Windows admin password.
As a golden rule, your access password should be a minimum of fifteen characters, and it should include letters, digits, and punctuation marks. After all, you don’t want your whole neighborhood to use your Wi-Fi, right.
For most Wi-Fi networks, changing your access password is a simple process. Note that the UI on your router may vary slightly:
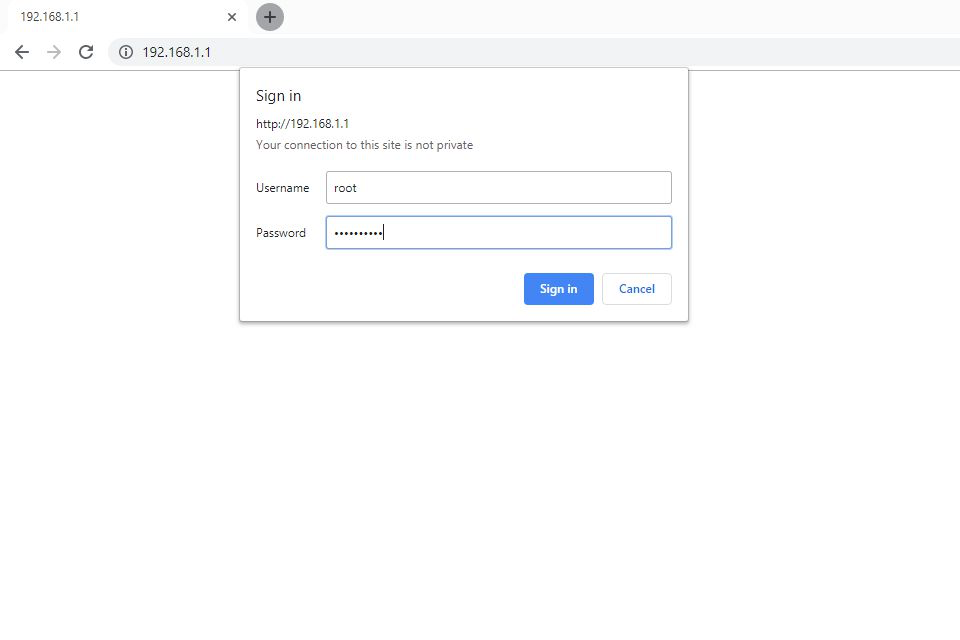
- Open the configuration page on your router (type in the default IP address, which is usually either 192.168.0.1 or 192.168.1.1 - double check to make sure on the side or bottom of the router).
- Log in to the router with your password and username - this information can also often be found on the side or bottom of the router.
- Select “Wireless Security” or “Wireless” after logging in.
- Select “Wi-Fi Password”.
- Enter your new password, and you should also be able to change the SSID as well
- Click “Save”.
3. Failing To Change the SSID
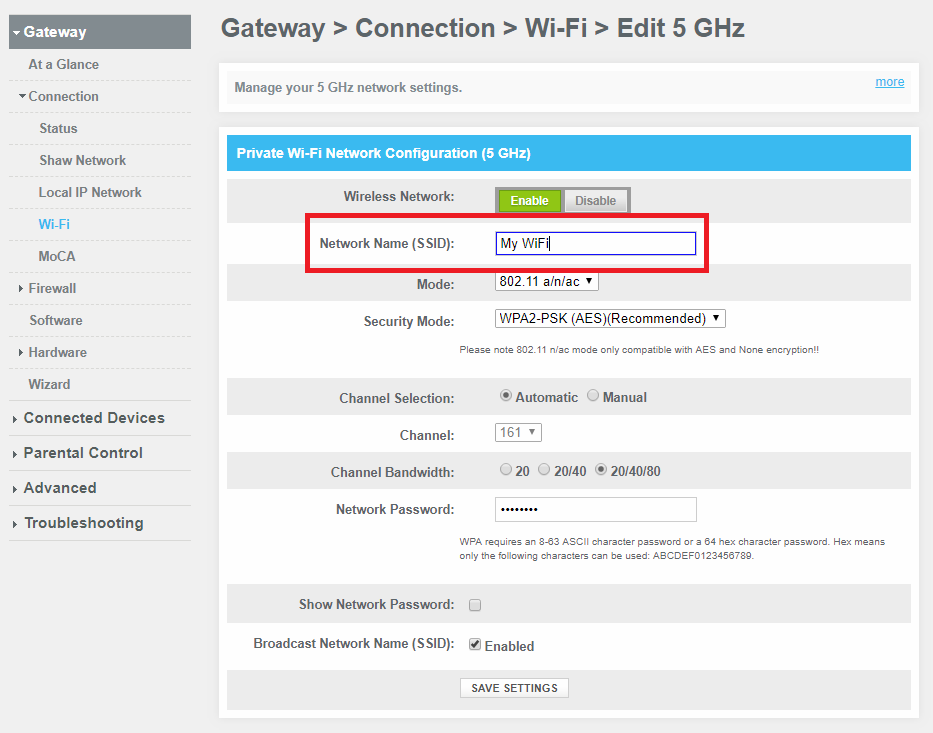
The very first thing that you should do when setting up and securing your home network (in addition to changing the password) is to change the SSID (Service Set Identifier), or the name of your network. This automatically makes it harder for cybercriminals to figure out what kind of a router you have. By finding out what kind of router you have, a knowledgeable hacker will know what kind of vulnerabilities your router has as well.
When your router creates more than one network, each new network will have its own unique SSID. You would be wise to change the default SSID on each of them. Whenever you use a default SSID, it will become much easier for a cybercriminal to crack your network's WPA2 encryption. This is because the encryption algorithm includes the network name, and common password cracking dictionaries include SSID names. As a result, by knowing your default SSID, even a more inexperienced hacker will have a much easier time breaking into your network.
When choosing an SSID, make sure that it does not give away any personal information at all. You should also make sure that you don’t choose the same name used on any portable Wi-Fi devices you own as well, as doing so would likewise make things easier for a hacker.
NOTE: most routers come with an option to hide your SSID, but the truth is this is not as secure as it may sound because more experienced hackers can bypass it. Furthermore, selecting this option requires you to type in the name of your network each time you connect, which can be a hassle.
For most routers, the process for changing your SSID should be the same as changing your access password:
- Open the configuration page on your router (type in the default IP address, which is usually either 192.168.0.1 or 192.168.1.1 - double check to make sure on the side or bottom of the router).
- Login to the router with your password and username. If you didn’t already change the password (which you should have),this information may be found on the side or bottom of the router.
- Select “Wireless Security” or “Wireless” after logging in.
- Change your SSID.
- Click “Save”.
4. Failing to Take Action Against WPS Threats
WPS, or Wi-Fi Protected Setups, are incredibly vulnerable to brute force attacks because hackers can simply use different PINs to break in until they eventually succeed. For this reason, WPS should be disabled across all devices, with additional security measures taken for devices where turning off WPS is not an option.
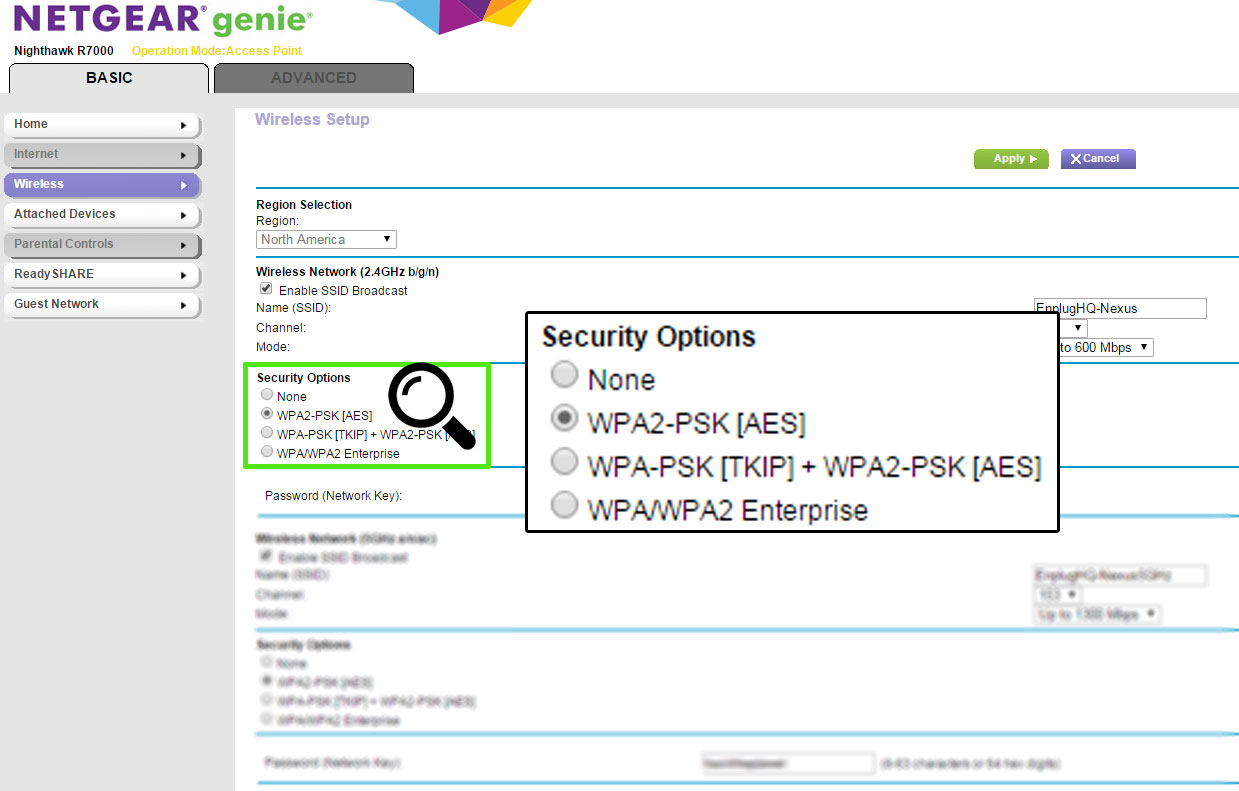
Right now, your router most likely has WPS enabled by default. Because it is an inherently insecure feature, you should take it down right away. Your Wi-Fi network will still be secure with WPA2-PSK (pre-shared key) encryption in conjunction with a strong password.
When setting up WPA2-PSK, you can set up a wireless passphrase on your network’s router and then deliver the same phrase to each device that connects to your network. This will help to protect your network against unauthorized access, because the router will need to derive an encryption key from the passphrase, which helps to encrypt all wireless network traffic.
The only thing that is somewhat inconvenient about WPA2-PSK is that you have to enter your passphrase on each device connected. The whole purpose of WPS, and the reason why some people believe it’s a good idea, is to give you an easier way to connect rather than having to enter the passphrase each time.
Unfortunately, the WPA is secured merely with an eight-digit pin, which can be easily broken by any experienced hacker who knows how to launch a brute force attack. After all, there are only eleven thousand four digit codes in existence, and figuring out the last four becomes easy once the first four are discovered.
Take note that some routers do not allow you to disable WPS on their configuration interfaces. Make sure that you use a router that allows you to do so, and switch to a new one if your current one does not. The most secure kinds of routers are ones that do not include WPS at all.
To set up WPA2-PSK encryption, follow these steps:
- Log into the configuration page of your router.
- Enter the IP address of your router into the address bar in your browser.
- Enter your admin username and password.
- Go to the “Wireless” section in the settings menu.
- Select WPA2-PSK encryption.
- Click “Apply”.
5. Lack of Cloud Backup
The cloud simply provides the best way to back up your data. The best cloud services can encrypt your backups and automate the entire process. Data backups are ultimately a critical element of minimizing the risk of data being lost or compromised.
Protecting our online privacy and minimizing the risk of data loss has become both easier and more complicated thanks to cloud service providers. On the one hand, any data you store in the cloud will be far more secure than if it were stored in a hard drive. On the other hand, cloud applications need to be protected as well.
Cloud security differs by the type of computing being used. SaaS (software-as-a-service), IaaS (infrastructure-as-a-service), and PaaS (platform-as-a-service) are the most common types of public providers. Private providers differ in that they are designed to provide services to only one customer, while also being operated by a third party.
For personal use, a private cloud provider will most likely be the best option for you. Each time you perform a backup (which you can also schedule to occur on a regular daily or weekly basis), all of your software and data will be stored in a remote site that can be accessed at any time.
Examples of measures that you can take to further boost your cloud security include advanced internal firewalls, event logs to build a narrative concerning network events so security breaches can be predicted ahead of time, and intrusion detection systems that will identify when the initial defenses of your network have been breached.
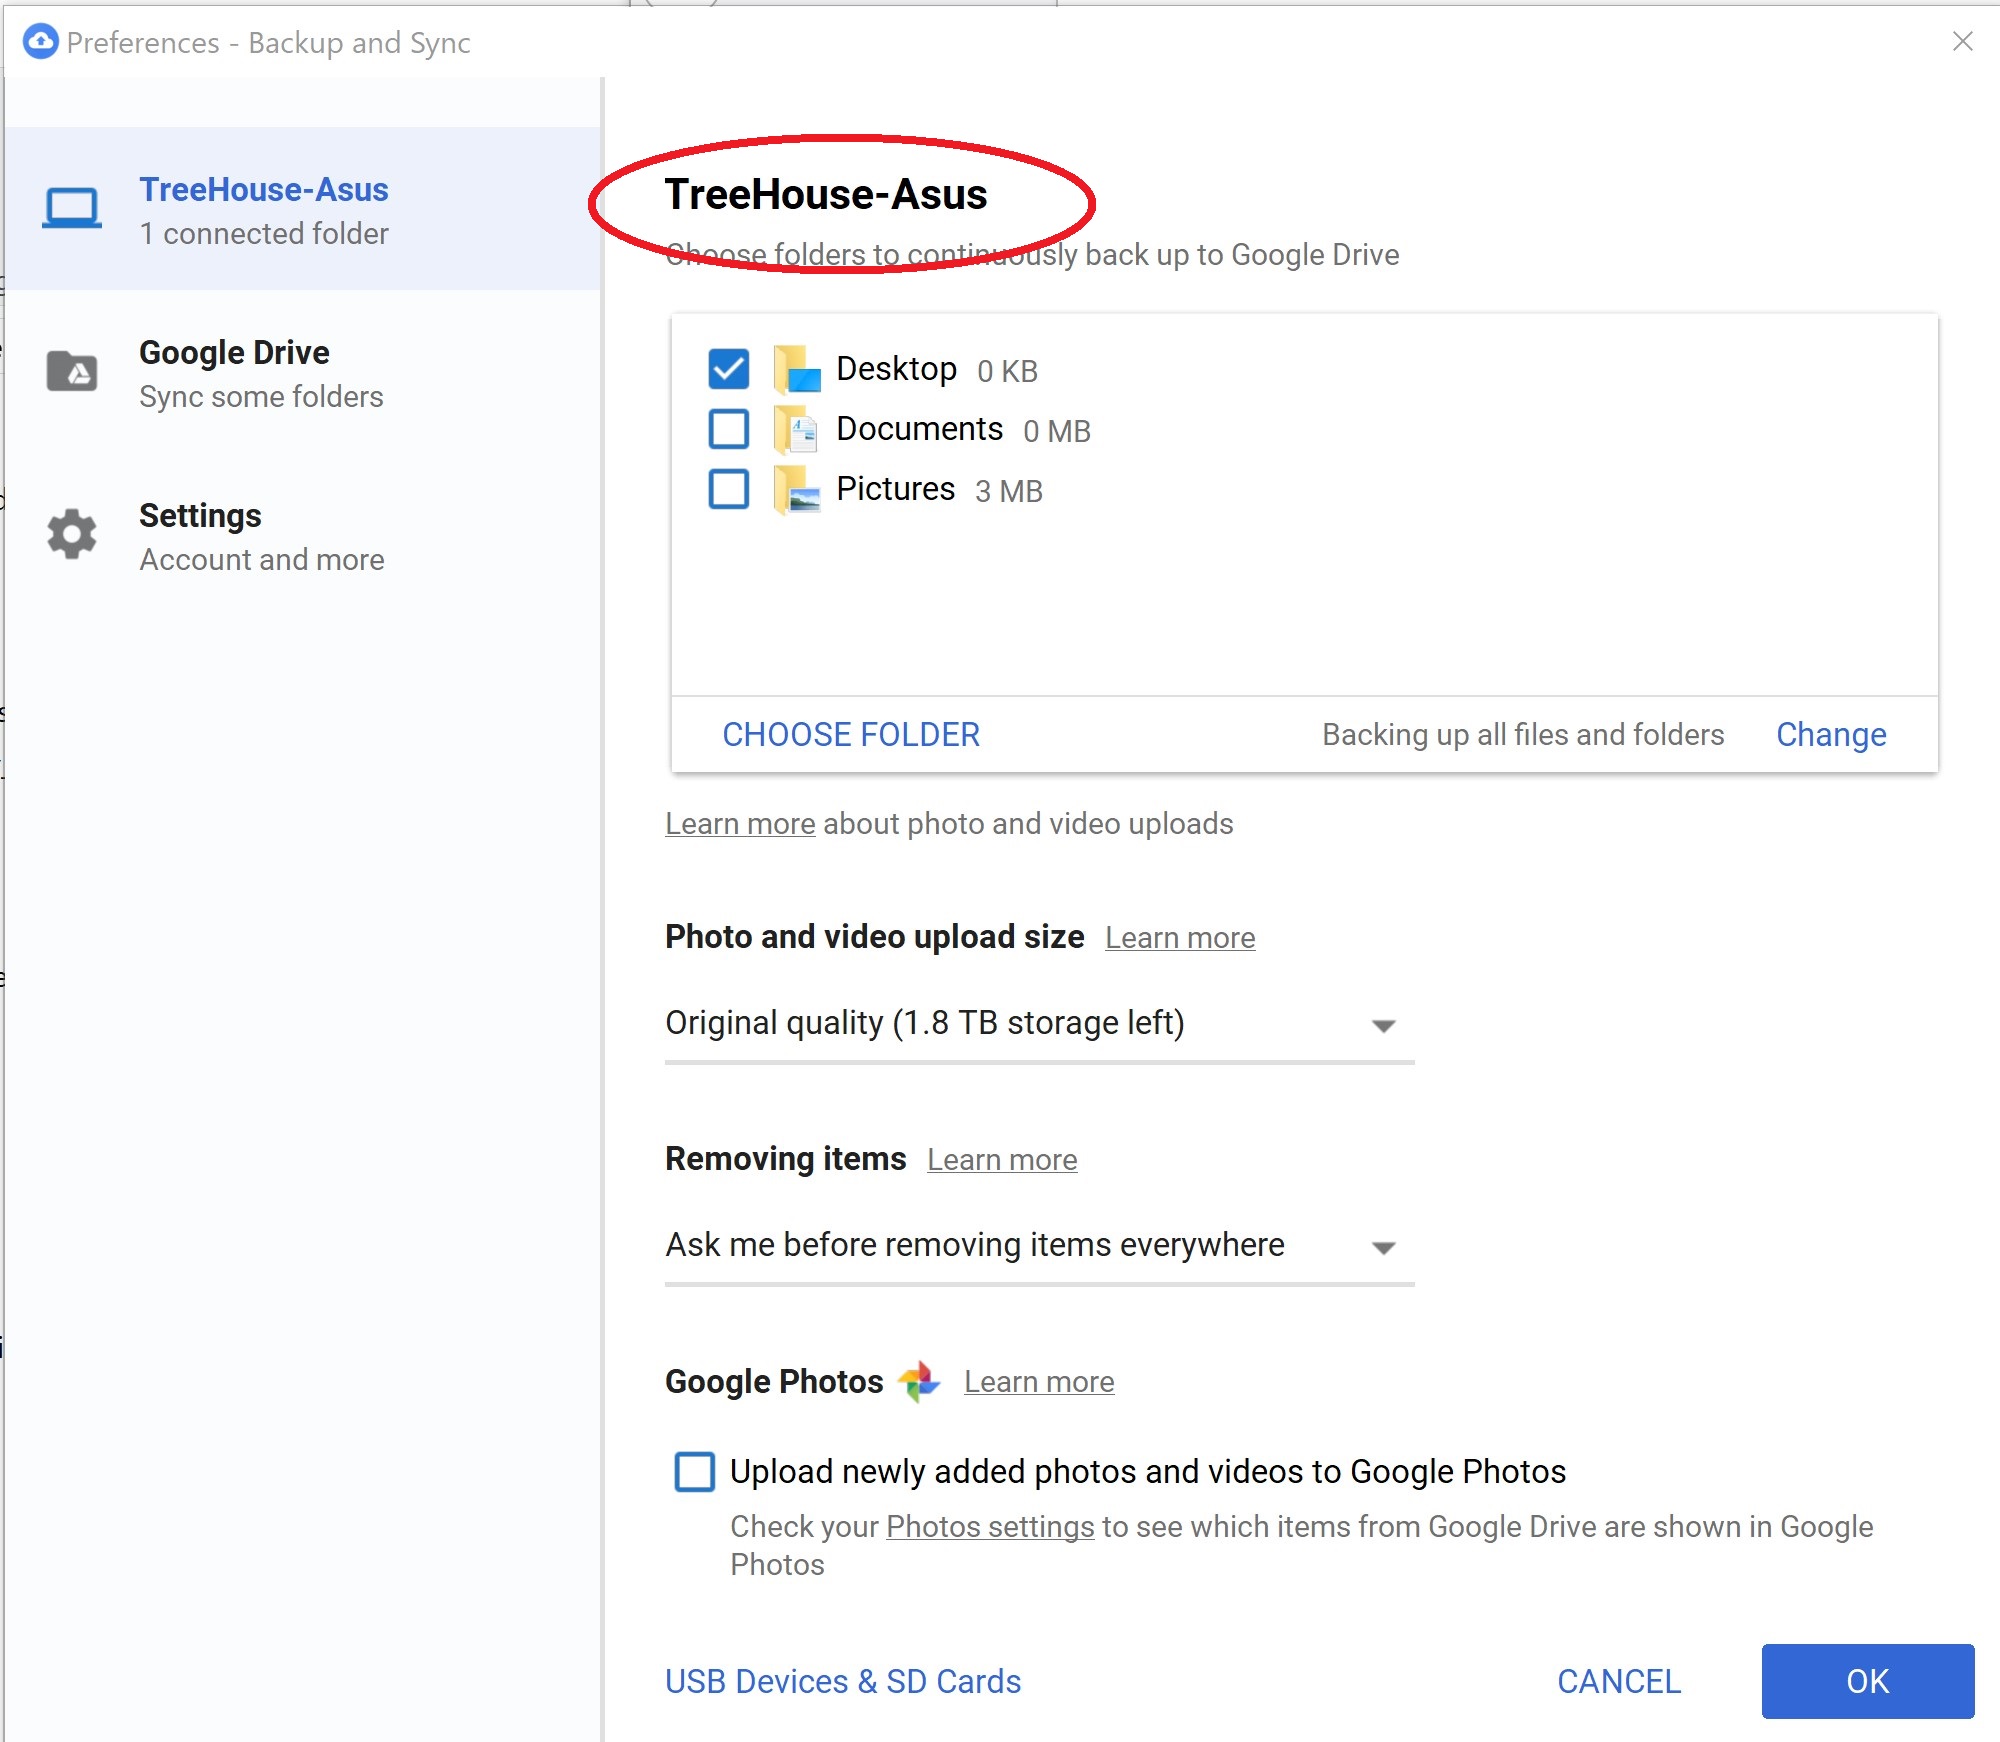
In the case of Google backup, this is very simple to do:
- Connect your PC to your Wi-Fi network.
- Install Backup and Sync to your PC.
- Choose the folders and files that you want to backup.
6. Connecting From Unfamiliar Networks Without VPN
You can rely on a virtual private network, or VPN, to encrypt your traffic and data when connecting from an unfamiliar network. Any data that comes from your computer through servers in a different location will become scrambled so it cannot be read by hackers.
Public internet hotspots arguably serve as the most vulnerable access point to your PC, including hotels, airports, restaurants, and coffee shops. Cybercriminals will often deploy sniffing software to these hotspots to hijack devices within around five hundred feet.
VPNs are specifically designed to guard your PC against these kinds of attacks in a public setting. Hackers, sniffing software, and ISPs will be prevented from looking at your social media messages, emails, browsing history, downloads, and any other information that you send over the network.
To get a VPN, you'll need to sign up for a free or paid VPN service that lets you route your traffic through its servers. Most services have their own client software. However, in many cases, you can also use Windows built-in VPN capability instead.
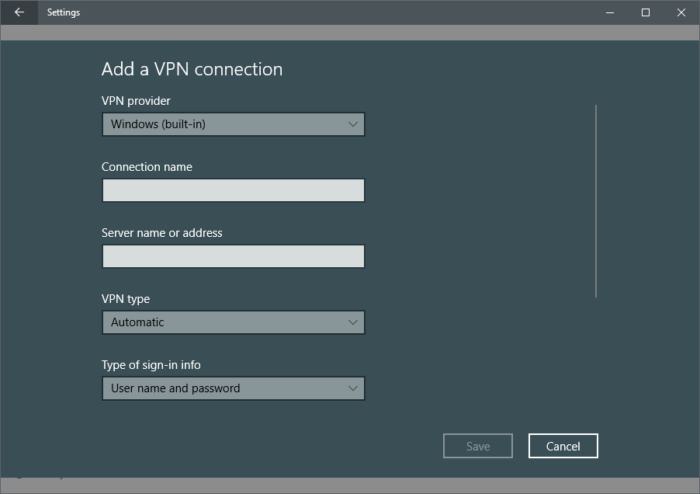
To set up a VPN on your PC using Windows 10's built-in VPN client, follow these steps:
- Enter "VPN" in the Windows search bar.
- Select “Change Virtual Private Networks (VPN).”
- Click “Add a VPN.”
- Enter the details for your VPN in the new screen.
- Select “Windows” underneath “VPN Provider.”
- Change the VPN type to automatic.
- Choose your username and password.
- Fill out the server name and connection name (these can vary depending on which VPN you are using).
- Click the Wi-Fi icon in your taskbar.
- Select your new VPN connection (it should be at the top of the list).
The new VPN should connect automatically.
Be sure to use an actual VPN and not a proxy server. While both will change your IP address, a proxy will not encrypt your connection. Speaking of encryption...
7. Not Encrypting Your Hard Drive
Enabling device encryption on Windows 10 will help keep your data protected from unauthorized access in the unexpected incidence that your laptop is stolen. The entire system drive connected to your device will be scrambled and you will only be able to access it with the correct data.
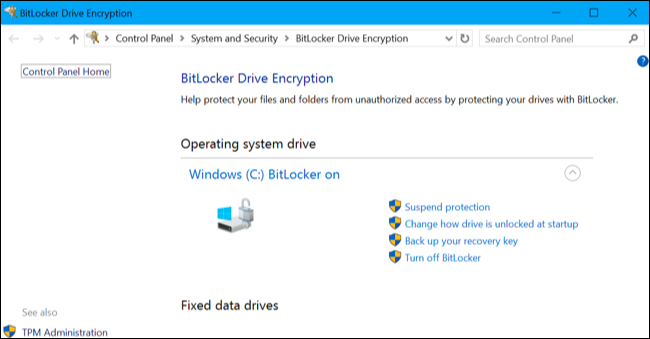
The primary disk encryption software that Windows 10 uses is called BitLocker. To use it to encrypt your hard drive with Windows 10, you will need to follow these individual steps:
- Go to “This PC” in Windows Explorer to choose the hard drive you want to encrypt.
- Right-click the target drive.
- Select “Turn on Bitlocker”.
- Select “Enter a Password”.
- Type in your secure password of choice.
- Select “How to Enable Your Recovery Key”.
- Select “Encrypt Entire Drive”.
- Select “New Encryption Mode”.
- Select “Start Encrypting”.
- Restart your computer (assuming you’re encrypting your boot drive).
Take note that encrypting your hard drive will take some time, but you can also still use your computer while it runs.
8. Allowing UPnP on Your Router
UPnP (Universal Plug and Play) comes enabled by default on several new routers. It essentially means that an application can forward a port on your router automatically, so you do not have to forward the ports manually yourself.
However, UPnP also serves as a common gateway for malware to infect home networks because it allows malicious programs to bypass firewall security. This is because UPnP assumes that all programs can be trusted and will allow ports to be forwarded.
To be more specific, viruses such as Trojan horses can use UPnP the same way legitimate programs do.. They accomplish this through installing remote control programs that can open up a hole in the firewall of your router. Disabling UPnP is beneficial because it means that the Trojan horse will be incapable of opening up the port.
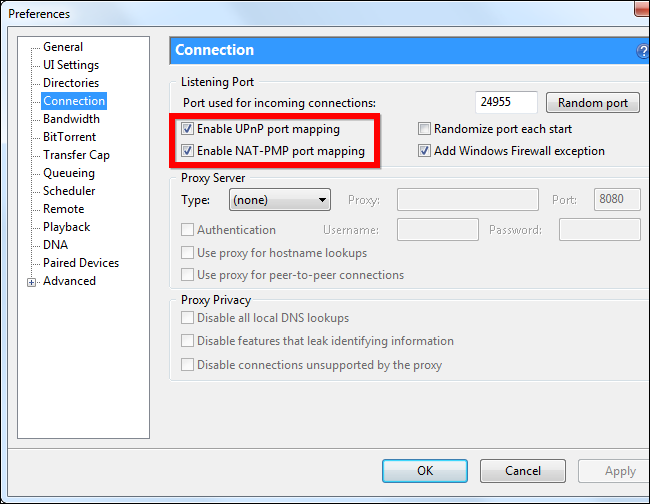
Ultimately the risks to UPnP far outweigh the benefits. You can disable UPnP on most routers through the “NAT Forwarding” section on the advanced settings menu. Simply follow these steps:
- Log into your router's admin page; this should take you to the basic home page
- Select “Advanced.”
- Select “Advanced Setup.”
- Select “UPnP.”
- Uncheck the UPnP checkbox.
9. Not Monitoring for Unknown Connections
Continuous monitoring of your home network is a necessity for keeping yourself up-to-date on new threats, but is also something that many homeowners who lack general cybersecurity knowledge overlook. Checking your router’s log and installing monitoring services are absolute necessities.
There are a number of ways that you can monitor for unknown connections as well. The first is to check your bandwidth usage using your network router. The router is the best place to check because it processes all online traffic to and from your home. You should be able to check each device connected to your router on the settings page. Here, you can view network information such as the amount of data that each device has used and downloading/uploading speeds.
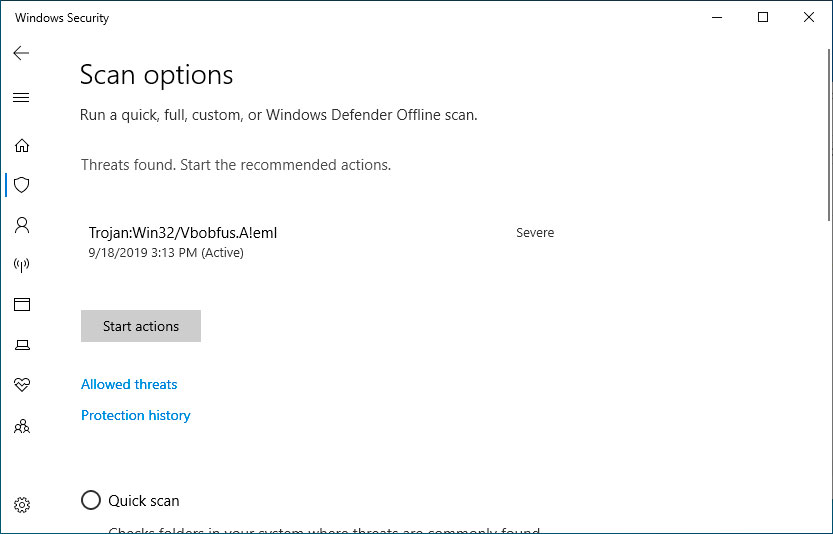
Next, make it a habit to scan your system for malware on a weekly basis as well. This is because bandwidth issues don’t just come from your local network; they can also come from external malware that is stealing bandwidth from you through communicating with an external server. Run a scan of your full system using antivirus software, and then remove any malicious items that are brought to your attention. You should notice your bandwidth increasing afterward.
Simply follow these steps:
- Navigate to Settings.
- Go to Update & Security.
- Go to Windows Security.
- Select “Virus and threat protection”.
- Select “quick scan”.
Windows Security will then conduct a scan, and you can view the results
10. Failing to Bolster Access Control (NAC)
Network access control (NAC) refers to securing devices that connect to your network. The best NAC plans set clear guidelines on location-based access, patch management policies, and security compliances. Failing to set a clear NAC policy can create chaos with your home network, especially in the era of IoT devices.
NAC systems work specifically through authenticating and authorizing users attempting to access your network through client device profiles. However, they can fall short in a variety of ways: they may only be given limited ability to make access decisions, they don’t always offer encrypted communications, and they may rely on existing network segments with weak security.
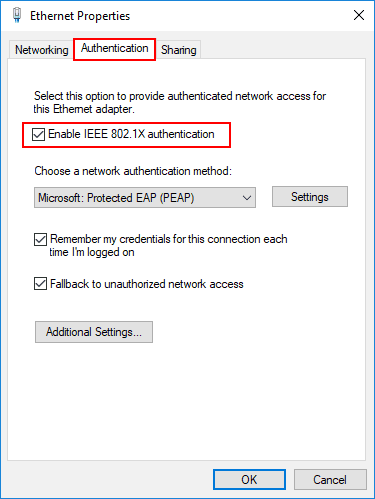
Fortunately, there are also a few strategies you can use to bolster your NAC. One is to rely on an AES-encrypted virtual private network, which works by permitting a secure channel for external users to access your network’s resources. Another is to ensure that your NAC follows the 802.1x protocol, which means that anyone who attempts to connect to a device on your network but fails to authenticate will not be permitted through.
To manually set up the 802.1x protocol on Windows Security, you can follow this process:
- Require the user to set up a new wireless network.
- Enter the network name.
- Set the security type.
- Set the authentication method, and choose 802.1x.
- Follow any additional steps as required, and your device should be authenticated and equipped with a certificate.
11. Letting Guests Use Your Main Network
Allow visitors to use the guest network instead of the main network so they have less chance to accidentally break into your devices. Also, put all of your smart home devices on the guest home network so if one of them is compromised, it won't be on the same network as your PCs. Many of them have poor security and you don’t want them to become beachheads for hackers trying to get into the rest of your devices.
There are several reasons why you should have a guest Wi-Fi network set up. Whereas you should rely on a more complex password to secure your main network like we discussed previously, you can use a simpler and more shareable password for your guest network. You can also change this password out regularly to help protect it as well.
In addition, your files and data will always be kept more safe on your main network if you have any guests to your home stream or connect to the internet on the guest network instead. Finally, guest networks means that if your guests inadvertently bring around threats like malware or network worms when connecting to your network, these threats will not migrate over to your main network.
For most routers, setting up a guest network is very simple, and you will just need to follow these steps:
- Confirm that your router has a guest network capability built into it (most do).
- Log into your router’s admin page using your browser.
- Go to “wireless setup”.
- Confirm your network’s name with your SSID - take note that guest networks will use a different SSID than the primary network.
- Activate the guest network feature (several routers will have it disabled by default, while others will have it set by adding ‘guest’ to the suffix).
- Set SSID broadcast to either on or off. If it is on, then anyone who is scanning for a nearby network should see the guest network. If SSID broadcast is disabled, then guests will need to manually configure their own connections.
- Go to your Wi-Fi security page and choose a password.
12. Not Updating Your Router's Firmware
This is incredibly important. If your router has an option to update its firmware automatically, turn that on. Otherwise, learn how to update your router’s firmware manually and check for updates each month.
It will always be more difficult for your router to block new threats if the firmware is not kept up-to-date. The easiest way your firmware is to:
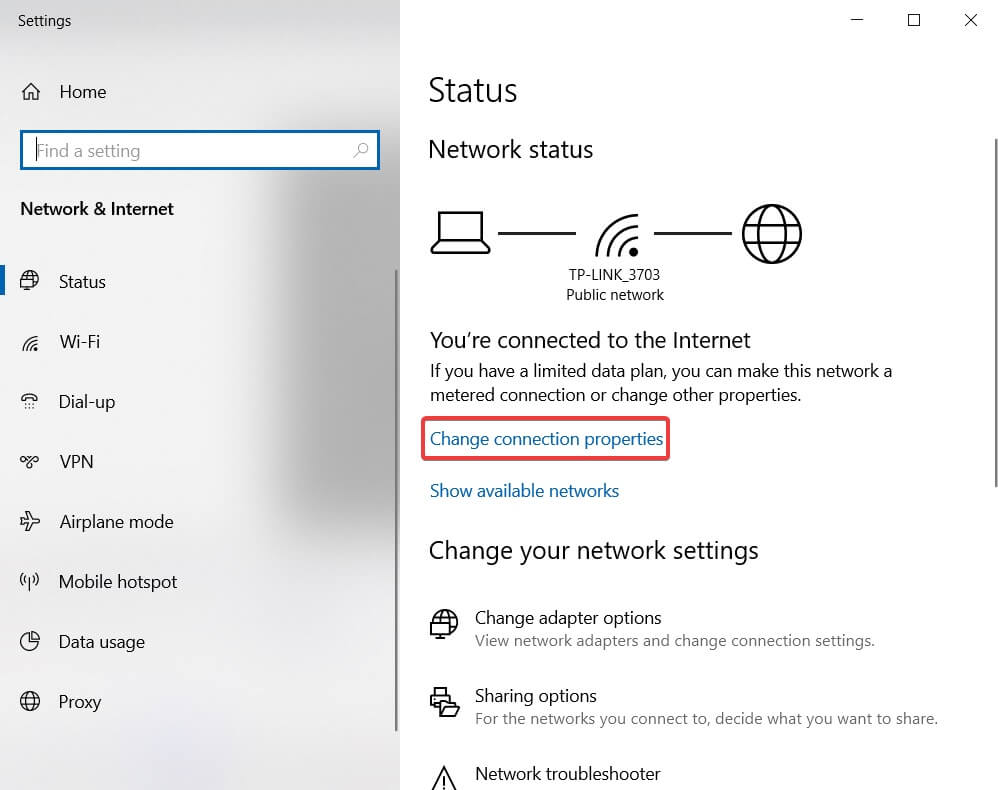
- Log into your router's admin page.
- Select “Firmware” (the name and position of this option will vary based on your router type).
- Download the latest Firmware update from the website of your router’s manufacturer.
- Upload the update.
- Reboot the router.
Take note that routers will often reboot automatically once the firmware has been applied. In the event that it doesn’t happen, however, press down on the reset button on the back of your device for at least ten seconds. The lights will flicker on and off to indicate that the device has been successfully rebooted.
13. Not Using IDS/IPS To Track Packet Floods
IPS (intrusion prevention systems) and IDS (Intrusion detection systems) are used to analyze network traffic for signatures and packets that match cyberattacks. They are ultimately a critical component of preventing a cyberattack before it happens.
IDS and IPS work by monitoring network traffic in order to detect anomalies. Once the IDS detects any anomalies that they deem to be malicious, the IPS will intercept the traffic and either drop packets from being delivered or reset the connection in order to stop the threat. Think of IDS as the monitoring system, and IPS as the control system.
IPS solutions are capable of preventing any kind of malicious traffic sent over a network, so long as the traffic has a known attack signature or can otherwise be detected as an anomaly.
Generally speaking, to set up an IPS on your PC you will need to go to the configuration page of the firewall provider that you are using. While the specific steps will vary depending on the provider that you are using, in general, you will need to follow a step-by-step process similar to as follows:
- Go to the Configuration page.
- Go to the Virtual Servers page.
- Go to Your Virtual Server.
- Go to Assigned Services.
- Go to Firewall.
- Go to IPS Policies.
- Select “Lock.”
- Select the “Enable IPS” check box.
- Select “Send Changes.”
- Select “Activate.”
Conclusion
As one final piece of advice, don’t end your research here. PC security is an ongoing process and not a one time event. Hackers are constantly coming up with new methods to steal personal information that they can sell. Just as major corporations and organizations invest heavily into cybersecurity, so should you.
-
Soaptrail Asking for a friend but if my VPN was always disconnected at 11:26am and i turned off the router firewall will make me suseptible? My Aiprotection says i am safe.Reply -
wschloss Setup a router 'guest' account for Roku, Apple TV and other household streamers. Good idea BUT, to control them from smart phone, will have to switch/connect over to that network. Think my wife will remember to do that, or put with the inconvenience if she does.? Many good ideas here but they are security driven, not user friendly. Need to think some of these through more.Reply -
domih 1. Failing to Change Your Windows PasswordReply
==> And do not forget to change the password of the Administrator account too.
2. Failing to Change the Access Password
==> Also change the admin password of the router (if you're the owner, e.g. at home)
==> Check that admin access is restricted to wired (no admin access via WiFi)
5. Lack of Cloud Backup
==> That is if you trust your cloud provider.
==> Upload encrypted data (with keys only stored locally, not on the cloud).
==> Backup data locally on a NAS which is NOT always ON. When off the NAS is air-gapped which is the best protection. Otherwise backup on a USB external drive which is ON only when you are backing up. Encrypt the backup with keys which are NOT on the NAS or USB drive. Keep a copy(ies) of the backup at another location, e.g. trustable friend or trustable cloud storage.
6. Connecting From Unfamiliar Networks Without VPN
==> ONLY use a paying VPN (e.g. NordVPN, ExpressVPN, etc). Always remember that when you are using something "free" on the Internet it means that you are the "product", meaning the free service is collecting info and reselling it to marketing companies or sometimes more nefarious organizations.
==> Maximize the usage of the VPN: simply always use it. Do not use it only when you access a service that rejects the IP ranges of your VPN.
7. Not Encrypting Your Hard Drive
==> It does not hurt besides some IO speed degradation, but it only provides a false sense of security. File system encryption use key(s) which are on the SAME machine and stored on the disk(s) so that it can boot and mount the volumes. "Good" crackers (plus organizations such as the NSA) will find a way to get at the keys and decrypt your disks.
12. Not Updating Your Router's Firmware
==> Yes! Yes! Yes!
==> Before buying a router always check how often the brand manufacturer updates the router's firmware throughout the years. Tip: this will reduce a lot the number of brands you can choose from.
Additional tips:
==> Phishing: assume by default that all the emails you're receiving are NOT legit. NEVER use a Link from an email. Example: if your bank, hospital, health provider or insurance sends you an email with links, open the browser and access your account manually using a bookmark with the validated bona fide URL, then manually go the page you're supposed to access.
==> Practice reasonable decision making when accessing a web site. "Good" crackers do not even need you to click something on their page, they use browser exploits during the page loading phase to attempt to run rogue code, e.g. make your PC member of a botnet for their use or for resell.
==> Recovery: if you have been hacked (including Ransomware). Zap your disks, re-flash BIOS, reinstall OS from scratch (not a backed up one), ONLY use backed-up data from air-gapped systems for restoring your non-OS documents and files.
==> Avoid using "free" apps unless your are certain of their legitimacy.
==> Close your social network accounts: "free" services like Facebook are just giant data collection systems for resell to marketing companies. Law enforcement loves Facebook to retrieve people, not that you should mind about it if you are a honest citizen and do not believe in nutty conspiracy theories. However specialized companies also use it to report if you are respecting the conditions of a client private service company: e.g. they are no pictures of you on the beach or in a bar drinking alcohol while you are supposed to be at home on payed sick leave.
==> If closing your Facebook account is too drastic, you can still avoid to play these stupid little games whose access was sent to you by your old uncle or stupid young nephew. All these online FB games have only one goal: collect your social data. If you play such a game the Terms of Use which you obvioulsy never read mention that you agree to enter into a commercial relationship with the game provider. This engagement usually authorizes the game provider to collect a huge swath of your social data as well as that of your "friends". The data is then sold to marketing companies.
==> With enough data points collected about you from social network sites or from Internet usage, uniquely identifying you is a certainty. Up to you to decide if this is something you care about. -
Phaaze88 I'm a bit surprised there's no mention of using torrents/cracks or browsing around x-rated sites which are likely infested with malicious software...Reply