Exclusive: Sixa’s Rivvr Wireless VR System, Hands On
At CES 2017, wireless VR upgrades were the hot commodity in the VR section of the tradeshow. Nearly a half dozen companies announced or showcased wireless VR upgrade kits for the Vive and Rift, including TPCast with its HTC-approved Vive upgrade and DisplayLink with its wireless technology for future HMDs. Amidst the crowd at CES, a company called Sixa revealed a wireless VR upgrade that works over standard 5GHz WiFi.
We caught up with Sixa after the show for a remote demonstration and explanation of the technology, but that’s not the same as seeing it in person. Sixa made some bold claims about its Rivvr system that we needed to see for ourselves.
Sixa said that its technology works on 2.4GHz and 5GHz WiFi networks thanks to its propriety compression technology that can shrink a 10Gb data stream to 40Mbits. Sixa runs a cloud-based desktop hosting service, and the company adapted its cloud hosting compression algorithms to the Rivvr VR system for use with high-end VR systems such as the HTC Vive and Oculus Rift. Ultimately, Sixa plans to offer cloud-hosted VR-ready machines, so that you don’t need a computer to play VR games. With a wireless network, a VR HMD, and a Rivvr wireless receiver, you could access a cloud-hosted desktop with your VR content.
Sixa’s goal sounds incredible, but it’s easy to make a claim and set a target. Delivering on your plans is the hard part. Sixa agreed that we had to see the technology in person, so the company packed up a prototype and sent it our way for a couple of weeks so we could give the system a thorough rundown.
3D Printed Receiver
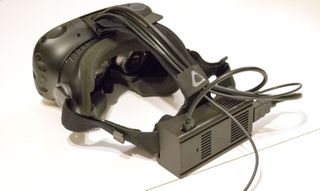
Sixa is getting ready to start production of the first 4,000 Rivvr units, but it doesn’t have the final hardware in hand yet. The company sent us one of its 3D printed prototypes.
The fit and finish of the device that we received wouldn’t compare to the consumer product, and we can’t say for sure that the components won’t change. But the prototype gives us a glimpse of how the solution works and how you’ll set it up.
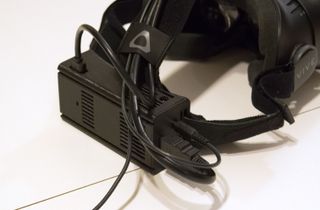
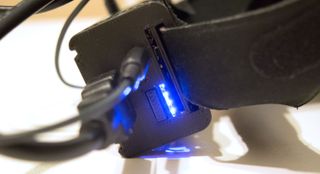
The Rivvr receiver box attaches to the back of your HMD and replaces the long tether cable that usually hangs down your back. The Rivvr receiver features two USB 3.0 ports, a male HDMI output, power input and output ports, and a button to toggle power to the device. The box also includes a lithium ion battery pack like the ones commonly found in portable battery backup devices, as well as a set of four LED lights to indicate the level of charge left on the receiver. Sixa’s design includes a small computer like a Raspberry Pi. We didn’t want to risk breaking the 3D printed prototype, so we didn’t try to open the box to see what hardware Sixa crammed inside.
Stay On the Cutting Edge: Get the Tom's Hardware Newsletter
Get Tom's Hardware's best news and in-depth reviews, straight to your inbox.
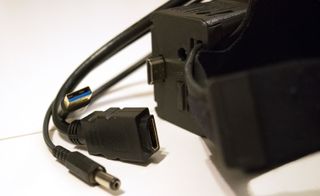
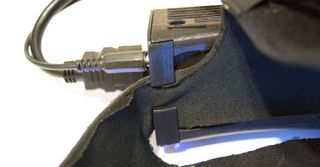
The Rivvr kit includes short tether cables that connect the receiver to the HMD. The setup that Sixa sent us included a Vive with the Rivvr receiver pre-installed, but it won't be difficult to install it yourself. The cables for the HMD are hidden under a removable panel. Open it up, and you’ll find a power cord, a USB cable, an HDMI cable, and an audio jack. You remove each cable except the audio cable and swap in the short replacement cables. Then, feed the short cables through the guides on the upper strap and connect them to the corresponding port on the Rivvr device. The Rivvr receiver attaches to the upper section on the rear of the head strap.
Pre-Loaded Laptop, No Benchmarks
In addition to the Rivvr receiver and the Vive system, Sixa sent us an Asus ROG G701VI VR-ready gaming laptop with the Rivvr launcher pre-installed. Sixa told us that it isn’t possible to remotely update the prototype Rivvr hardware, so the company had to send a system with a specific build of Steam installed. To ensure that the install wouldn’t be affected by an update, Sixa set the Steam folder to read-only status and set the account to log in offline. For those reasons, we had limited access to content.

Sixa pre-loaded a handful of games, including Space Pirate Trainer, Audioshield, Tilt Brush, and the Everest VR experience. That meant we couldn’t put the wireless kit to the test in Raw Data, Project Cars, or Arizona Sunshine, which would have stressed the wireless system harder than the games we got to try. With the Steam folder set to read only, we also couldn’t run Nvidia’s FCAT VR software on the system, because it couldn’t write to the log file. Therefore, we must wait until we get our hands on a production Rivvr unit to run those tests.
Sixa’s prototype setup also included a Ruckus R710 wireless access point, which provides the 5GHz wireless network on which the wireless HMD operates, because the company configured it for local testing without an internet connection. We didn’t want to mess with the configuration, so we didn’t hook the computer up to an active internet connection, which meant we couldn’t run Basemark’s VRScore latency test.
The Rivvr system also includes a Fit-PC headless HDMI adapter to activate the extra display output without connecting a display to it.
Pre-launch Checklist
Sixa pre-installed the software, preconfigured the hardware, and included all the equipment we would need. However, we still had a checklist to follow before everything would work properly. We expect that Sixa will streamline the process before Rivvr ships to customers, but our prototype was a little bit finicky. If you move through the steps too quickly, or in the wrong order, the connection will fail.
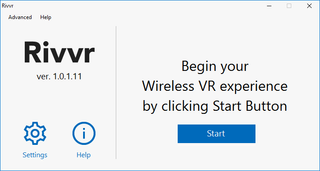
First, ensure that your wireless network is online. In our case, we have to power on the Ruckus access point and wait until the light for the 5GHz network turns on.
When the network is ready, double click the Rivvr receiver’s power button. The Vive’s light should turn red. It takes a minute or two for the Rivvr box to power up completely. When it’s ready, the Vive’s light should change to green, and the display should light up. If you look inside the HMD, you should see “Rivvr waiting to connect.”
Once the headset is running, insert the headless HDMI adapter and boot your computer. If your computer is already running, shut it down before plugging in the Fit-PC adapter. Once the PC finishes booting, launch the Rivvr desktop software.
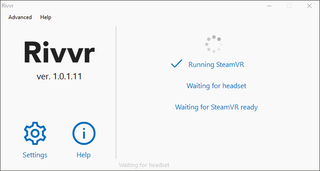
The software will automatically launch Steam and SteamVR and proceed to search for the HMD. If you follow the checklist properly, the Rivvr software should find the HMD. Make sure the headset is within the range of the Lighthouse basestations for SteamVR to find the headset. If this is the first time you’ve used the Vive on your computer, SteamVR should prompt you to calibrate. We didn’t use Sixa’s basestations, so we had to configure our setup. If your play space is already configured, the headset should be ready to use.
Wireless VR Works!
I have to admit, I was skeptical of Sixa’s claims. Virtual reality demands high performance and low latency, and it’s hard to imagine that a compression system and wireless network wouldn’t add untenable levels of latency to the equation. Sixa’s solution isn’t perfect, but the company put most of my skepticism to rest.
My first foray into the coveted world of untethered space pirating convinced me that Sixa's system works well enough to be a success. When I play SPT, I move around a lot, and I move quickly. Despite my best efforts to create a situation that would be a problem for the extra latency of the Rivvr kit, Sixa's wireless system kept up with my activity level.
The Rivvr system isn’t flawless, although we would say it delivers where it counts. Despite the compression, we didn’t notice any significant visual degradation--most of the time--but every so often the image would break up into a blocky blur that reminded us of trying to watch satellite TV in a rainstorm. It’s hard to say what cause the visual breakdown, but we suspect it relates to the PC’s performance. The visual degradation appeared to occur when many droids were on the screen at the same time. We also noticed that when you walk through the Chaperone barriers, the image breaks down the same way.
To test our theory, we fired up the Everest VR experience. Solfar Studio used hundreds of thousands of images to create the texture set for Everest VR, which should push Sixa’s wireless system to its limits. Sure enough, we experienced noticeable screen tearing in the Everest VR experience. Again, the limitation appears to be with the laptop’s performance, though. After we let the system cool down, we gave Everest VR another go, and the performance was much better.
Waiting For The Production Model
I had grown accustomed to the cable that hangs from the back from my head while playing in VR, but five minutes of Space Pirate Trainer without the cable reminded me just how limiting that tether is. The freedom of not worrying about where the cable is allowed me to concentrate more on the game and less on the real world around me.
Sixa’s Rivvr prototype demonstrates that the company isn’t blowing smoke and building hype over vaporware. The Rivvr system and the technology behind it works, but how well it works remains to be seen. The prototype hardware, unfinished software, and non-standard configuration gave us a glimpse of wireless VR, but it doesn’t tell us what the consumer experience will be like.
We look forward to seeing the final product so we can give it a full rundown, complete with latency tests to see how much of an impact the Rivvr system has on game performance. We also anticipate trying out a wider range of content with the wireless system; for example, we’d like to see how a demanding game like Arizona Sunshine runs over WiFi.
Kevin Carbotte is a contributing writer for Tom's Hardware who primarily covers VR and AR hardware. He has been writing for us for more than four years.
-
UnstoppableDrew How well does it work with the break-room microwave running? I know when my kid is streaming YouTube through the TV over WiFi, the quality drops and it stutters if we use the microwave.Reply -
virtualban Meanwhile in the soon future:Reply
Install/run app on phone, plug/install/run device/program on computer, put phone on VR holder, plug phones to phone, ...
One step at a time. Glad for this step. Many others will follow. -
Jeff Fx I like the placement on the back to balance the headset, but it's right were the tightening knob is on the Deluxe head-strap.Reply
Most Popular


