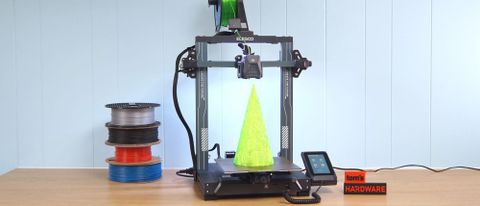
Tom's Hardware Verdict
The easy-to-use Neptune 3 Pro offers upgraded features, like a direct drive and dual Z axis, without an upgraded price.
Pros
- +
Easy assembly
- +
Simple Auto bed leveling
- +
Direct drive
- +
Dual gear extruder
- +
Quiet operation
Cons
- -
Difficult to upgrade
Why you can trust Tom's Hardware
Gone are the days of “beginner” printers that welcome new makers with a trial by fire. Elegoo’s simple to use Neptune 3 Pro arrives 90% pre-assembled and goes from box to first print in 30 minutes. Currently launching with a sale price of $230, the machine is as easy on your wallet as it is to set up.
The Neptune 3 was already an excellent 3D printer, earning 4 Stars when we reviewed it in June. The pro edition has added a few new goodies: a direct drive that really grips slippery filaments like TPU, dual Z screws for steady printing and a built-in task light. The task light is one of those small quality of life improvements that seems silly – until you find yourself squinting in the dark at your first layer.
Everything we liked from the Neptune 3 was carried over to this new machine or improved. The PEI coated build plate holds onto prints with the right amount of stick, then releases when cold. Bed leveling is a snap, and the Z height was on target without needing adjustment. The removable touch screen is easy to use, and thumbnails have returned when you use Elegoo’s slicing software.
This is by far one of our favorite printers and one we can easily recommend as one of the best 3D printers for both beginner and veteran makers.
Specifications: Elegoo Neptune 3 Pro
| Build Volume | 225 x 225 x 280 mm (8.5 x 8.5 x 11 inches) |
| Material | PLA/PETG/TPU/ABS (up to 260 degrees) |
| Extruder Type | Direct Drive |
| Nozzle | .4mm MK8 |
| Build Platform | PEI textured spring steel sheet, heated |
| Bed Leveling | Automatic, Inductive probe |
| Filament Runout Sensor | Yes |
| Connectivity | microSD card, USB Type A |
| Interface | Color touch screen, removable |
| Machine Footprint | 475 x 445 x 515 mm (18.7 x 17.5 x 20.3 in) |
| Machine Weight | 8.1 KG (17.8 lbs) |
Elegoo Neptune 3 Pro: Included in the Box
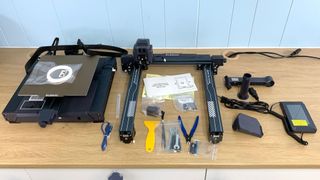
The Neptune 3 Pro comes with everything you need to get your printer set up. You get tools to build and maintain the printer, side cutters, a plastic scraper, 2 spare nozzles, and a microSD card with a USB adapter. There’s also a small sample of white PLA to print your first model.
The microSD card has a very helpful short video on assembling the printer. You also get a PDF copy of the manual, a copy of Elegoo Cura and a sample model in both pre-sliced .gcode and .stl format.
Design of the Elegoo Neptune 3 Pro
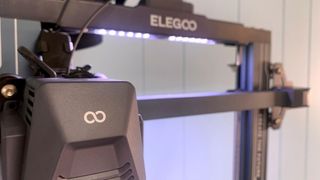
Perhaps Elegoo was listening when we said the old Neptune 3 wasn’t very distinctive, because the new Neptune 3 Pro has become quite the looker. The plain black frame of old has been swapped for gray aluminum with painted stripes and a catchy “Create the Future” motto stamped on the front.
The most interesting update is riding on the gantry: a dual gear direct drive that does an excellent job of grabbing squirrelly material like TPU. This machine has three cooling fans, and an improved aluminum heat sink. Elegoo brags about the new “TC4 titanium alloy” throat pipe, but there’s still a chunk of PTFE tube in there, meaning it’s not an all-metal hotend. The improvements should help prevent clogs, but you’re still limited to 260 degrees on the hotend – which is fine for most 3d printing enthusiasts anyway.
The power supply has been moved underneath the build plate to make room for a second Z axis screw. Shifting the weight lower and adding z rods on both sides should help with print accuracy, especially on taller prints.
The Pro is using a large removable touchpad with a magnetic base introduced in June on the Neptune 3. The pad is hooked to the processor with a curly landline style cord. If you’ve ever been annoyed by screen glare, you should really appreciate this upgrade. The graphic menu is easy to understand, though the “buttons” could be more sensitive.
Elegoo has also put some work into the auto bed leveling system, which now taps 36 points before making its calculations. It uses a hard mounted build surface and an inductive probe that works amazing well.
The run out sensor is now located near the spool and seems to be less tight than its predecessor. I didn’t have any trouble getting TPU through this one.
Assembling the Elegoo Neptune 3 Pro
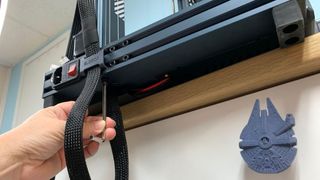
The Neptune 3 Pro comes mostly assembled, only needing a few bolts to put the machine together. The upper frame is attached to the base with 4 bolts that come up through the bottom.
The touch screen base screws into the side, but one of the screws is in such an awkward spot we couldn’t get the Allen wrench in there, so we left it off. This left the screen a bit wobbly. We could probably find a better wrench, but we like to assemble printers for review with the tools provided.
All the electrical connections are labeled – or extremely obvious where they need to go.
The video included on the microSD card is helpful – and Elegoo was thoughtful enough to mention the video twice in the printer’s documentation, so that users are aware of it.
Leveling the Elegoo Neptune 3 Pro
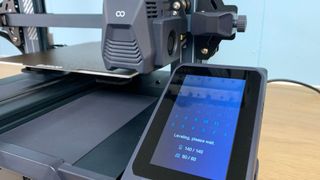
The Neptune 3 Pro comes with auto bed leveling with an inductive probe. Simply select Level on the main menu and the printer will heat up to 140 degrees on the nozzle and 60 C on the bed. After it homes, it will tap 36 points across the bed.
It will then stop at the center of the bed and wait for you to double-check the Z height. Do this by placing a piece of ordinary paper under the nozzle and lowering or raising it with the buttons on the touch screen until the nozzle just scrapes the paper.
You can also fine tune the Z height from the print menu while running a print, however I didn’t find this necessary.
Loading Filament on the Elegoo Neptune 3 Pro
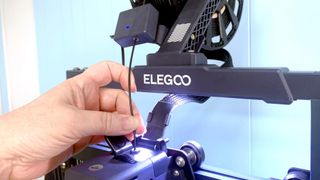
The Neptune 3 Pro is a direct drive printer with its extruder and hotend all in one spot. To load filament, tap Prepare on the main menu, then Temperature and select the one of four presets that match your filament. Once the hotend is warmed past 190 degrees, you can insert the filament into the top of the extruder and let the wheels pull the filament through.
To unload or change colors, simply reverse the process.
Preparing Files / Software for Elegoo Neptune 3 Pro
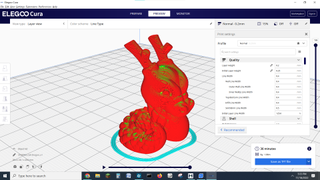
The Neptune 3 Pro comes with a copy of Elegoo Cura, which has profiles for all its machines. It also has the added ability to create a thumbnail of your model to display on the printer. This function doesn’t work if you use Octoprint, as the Raspberry Pi overrides the main screen.
Standard versions of Cura or Prusa Slicer don’t have profiles for any of Elegoo’s printers, but you can use the profile for an Ender 3 Pro and adjust the build volume accordingly.
Regular Cura can display thumbnails if you do a little workaround. Go to Marketplace in the upper right corner of Cura. Click Community Plugins. Select MKS Wifi Plugin. Sadly, this doesn’t give your printer WiFi without buying another piece of hardware. Reboot Cura, then select Manage Printers and enable the MKS plugin. Under preview, select Enable Previews. Use “default” for the printer, set Simage to 100 and Gimage to 200.
Printing on the Elegoo Neptune 3 Pro
The Neptune 3 Pro printed wonderfully right out of the box. My first print was the pre-sliced Buddha Elegoo provided on the microSD card. I used the supplied sample PLA and it turned out very smooth. The sample PLA was only enough to print one test file, so you’ll definitely want to order a few rolls of filament right away. Check out our guide to the best filaments for 3D printing for examples of our favorite materials to add to your supply.

This derpy pigeon stuck in a piece of bread is a two part, print in place model from Layers In Green. The bird has extendable legs that telescope from inside its body. These types of prints can be tricky, but the Neptune 3 Pro handled it easily with smooth, clean walls. The pigeon is printed in Protopasta Nebula Silver Silk and the bread is 3D Fuel Buzzed PLA. Both prints together took 6 hours and 51 minutes at 60 mm/s and a .2 mm layer height.
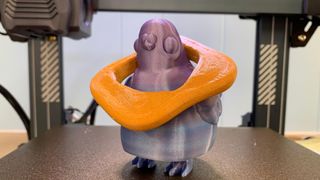
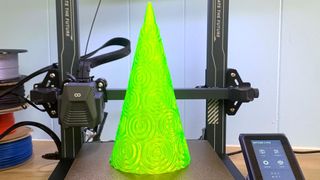
To test out TPU, I ran a wavy Christmas tree in vase mode using TPU. The print has no bottom and had to cling to the build plate by a single line width of TPU. It printed perfectly smooth with no gaps or problems. It took 4 hours and 40 minutes in vase mode, using a robust .64 mm line width and 50 mm/s speed. We printed it in Matterhackers Build Series Translucent Green TPU.
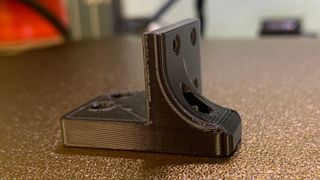
To test PETG, we used a more functional print from the Voron project. It printed clean and without distortion or stringing. The textured bed did not require any glue stick as a buffer layer and the print popped off as easily as PLA once cool. Using Protopasta Simply Black PETG, this printed in 42 minutes at a .2 mm layer height and 65 mm/s speed.
Bottom Line
The Neptune 3 Pro is a great 3D printer for people who want a polished machine that’s easy to use right from the box. Its simple auto bed leveling, PEI coated flex plate, and excellent direct drive will help beginners by eliminating the major headaches we often experience with stripped down basic printers.
This machine has an amazing amount of deluxe features packed into a bargain sale price of $230. Even when sold at an MSRP of $300, the Neptune 3 Pro will beat rival Creality’s Ender 3 S1 for $100 less. It’s not as fast as some newer machines hitting the market, but it offers reliability plus smooth, quality prints.
If you’re looking for an even bigger bargain, check out the $169 Creality Ender 2 Pro, a portable budget printer with a similar hotend and manual leveling, but much smaller build volume and no direct drive. If you want slightly more features plus an all-metal hotend rated to 300 degrees, check out the Creality Ender 3 S1 Pro for $499.
MORE: Best 3D Printers
MORE: Best Resin 3D Printers

Denise Bertacchi is a Contributing Writer for Tom’s Hardware US, covering 3D printing. Denise has been crafting with PCs since she discovered Print Shop had clip art on her Apple IIe. She’s been a freelance newspaper reporter, online columnist and craft blogger with an eye for kid’s STEM activities. She got hooked on 3D printing after her son made a tiny Tinkercad Jeep for a school science project. Excited to learn more, she got a Creality CR10s and hasn’t looked back. She loves reviewing 3D printers because she can mix all her passions: printing, photography and writing. When she’s not modding her Ender 3 Pro or stirring glitter into a batch of resin, you’ll find her at the latest superhero movie with her husband and two sons.

Ubisoft quietly launches blockchain RPG with playable NFTs priced up to $63K

UALink Consortium poised to compete with Nvidia's NVLink — AMD and Intel-led group opens doors to contributor members

Google now uses AI to write 25% of its new code — Alphabet CEO Sundar Pichai underlines the company's role in the AI industry amidst strong Q3 24 financials
-
slinkygn Thank you for the review!Reply
A question: the cons listed mention that the printer is hard to upgrade, but the article doesn't seem to say much about that. Could you go into more detail as to why it is harder to upgrade than other printers? -
Tomduckandharry Replyslinkygn said:Thank you for the review!
A question: the cons listed mention that the printer is hard to upgrade, but the article doesn't seem to say much about that. Could you go into more detail as to why it is harder to upgrade than other printers?
I guess the reviewer had to give a negative to make it not look like it was too much of a positive review but didn't think he needed to explain why. The first heading of this review:
"Creality Elegoo Neptune 3 Pro: Included in the Box"
Creatily Elegoo. Sigh. -
BTM18 Reply
Its such an obvious rip off clone. lmfaoTomduckandharry said:I guess the reviewer had to give a negative to make it not look like it was too much of a positive review but didn't think he needed to explain why. The first heading of this review:
"Creality Elegoo Neptune 3 Pro: Included in the Box"
Creatily Elegoo. Sigh. -
Terah2 Replyslinkygn said:Thank you for the review!
A question: the cons listed mention that the printer is hard to upgrade, but the article doesn't seem to say much about that. Could you go into more detail as to why it is harder to upgrade than other printers?
When talking about upgrading a printer weak spots need to be identified first.
The first Enders, and even later revisions, had a ton of weak spots when compared to certain benchmark printers such as the Prusa Mk3, so the upgradability was high.
Fast forward to this printer and taking note of what typically gets upgraded to make a printer better/more reliable... there simply is very little left to actually improve.
32-bit board, quiet, dual synced Z, direct drive, LED lighting, inductive bed leveling - this thing pretty much has all the upgrades already built into it
The only thing I can see as a possible upgrade is linear rails, given the front-heavy design of the extruder but other than that I got nothing.
