How to manage Linux network connections via the terminal
Manage your connections with just a few commands.
We take graphical user interfaces (GUIs) for granted. They generally “just work” and we can largely go about our business without even thinking. The Linux networking GUI is very much now in this camp. We were there when networking with Linux was a chore, heck we remember setting up PPP to connect to the Internet via a modem, in Linux!
What happens when things go wrong? The GUI breaks down, or were left with just a Linux terminal? Perhaps we are installing Linux on a server with no GUI? In these circumstances we need to understand how to make, break and configure connections using the ip command.
The ip command is the replacement to the ifconfig command and we can use ip to control all aspects of networking. In this how to we will show you how to use the command for many basic, yet essential networking tasks.
Working with an Interface
Interfaces are our points of connection. They can be physical, for example Ethernet, or they can be radio based, Wi-Fi for example. Each interface has a unique name, to identify whether it is Ethernet or Wi-Fi. In the past these names were generic, such as eth0 for the first Ethernet connection and wlan0 for Wi-Fi.
Our first task is to identify the available interfaces.
1. Open a terminal and list all of the available interfaces. The ip command can take just a letter (a), or a keyword (address) as an argument. The interfaces are numbered and typically start with the loopback (lo) interface.
ip a
or
ip address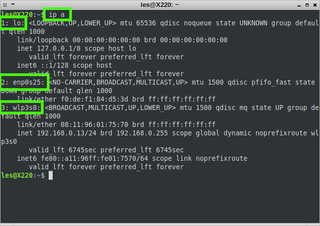
2. The output for the previous command will show all of the interfaces. To return just the up interfaces (active) use this command.
Stay On the Cutting Edge: Get the Tom's Hardware Newsletter
Get Tom's Hardware's best news and in-depth reviews, straight to your inbox.
ip link ls up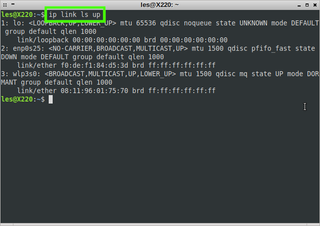
3. Use this command to get the details of a specific interface. Remember to change wlp3s0 to match one of the interfaces in your output. You can also pipe the output of the command using grep to pick out specific details.
ip a show wlp3s0

4. Use this command to determine the default gateway for your connection. The default gateway is typically our home router, the hardware that enables us to connect to the Internet.
ip r
5. To bring an interface down (disable / disconnect) use this command. This will disconnect your Linux device from the network. Remember to replace the interface name with your interface name.
sudo ip link set wlp3s0 down

6. List the up (active) interfaces, this will show that your device is no longer connected to the network. In our case we disconnected Ethernet and Wi-Fi.
ip link ls up
7. Bring an interface up using this command. We chose to bring our Wi-Fi (wlp3s0) up so that our laptop could connect to the Internet. Remember to change the interface name to yours.
sudo ip link set wlp3s0 up
Setting a static IP address
For many of us, a dynamically assigned IP address from our router is all we need to get online. What if we want to create a server? A server will need a static IP address to enable connecting devices to find it.
Using what we learnt from the ip command, we can see the interface names on our test system, wlp3s0 (Wi-Fi) and enp0s25 (Ethernet). So let's set a static IP address for the Ethernet port.
We’re using a Debian based system, but the instructions will also work on a Raspberry Pi running Raspberry Pi OS.
1. Open a terminal and make a backup of your existing network interfaces config file to your home directory. This is essential, it gives us a backup plan should the configuration break. The ~/ is shorthand for the current user’ home directory.
sudo cp /etc/network/interfaces ~/
2. Open the network interfaces configuration file using sudo and nano. The file is not something that an unprivileged user can edit using nano. Using sudo we can temporarily elevate our user account so that we can edit the file.
sudo nano /etc/network/interfaces
3. Scroll to the bottom of the file and add the following lines to your config file. Remember to change the values to match your home network and interface. The first two lines are for our loopback interface. The auto enp0s25 line will start the Ethernet interface on boot. The iface line is where we set the interface to use a static IP address.
On the subsequent lines we set our desired IP address, the netmask (to divide the IP address into subnets, typically 255.255.255.0), gateway (our router) and the DNS domain and nameserver. For DNS we used Google’s DNS server 8.8.8.8, but you can use any other DNS service, or your router.
auto lo
iface lo inet loopback
auto enp0s25
iface enp0s25 inet static
address 192.168.0.199
netmask 255.255.255.0
gateway 192.168.0.1
dns-domain tomshardware.com
dns-nameservers 8.8.8.8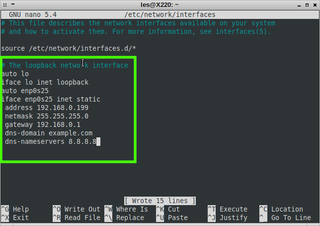
4. Save and exit nano by pressing CTRL+X, then Y and Enter.
5. Restart networking on your server for the changes to take effect.
sudo systemctl restart networking6. Using the ip command, check that your interface is up and that you have a connection. Listing the up interfaces and piping the output into grep, then searching for “inet” will prove that the interface is up and we are online.
ip a ls up | grep inet7. Finally ping an IP address to ensure that your server can reach the outside world. You should see pings being sent within a few milliseconds, if there is a problem then the command will error. Press CTRL + C to end the ping command. We typically use Google’s DNS server IP address 8.8.8.8, but you can also use CloudFlare’s 1.1.1.1 or OpenDNS 208.67.222.123.
ping 8.8.8.8More Linux Tutorials
🐧 How To Dual Boot Linux and Windows 11
🐧 How to Create Custom Grub Menu Backgrounds for Linux Boots
🐧 How to Use Nohup to Run Linux Scripts Unattended
🐧 How To Find Large Files on Linux
Les Pounder is an associate editor at Tom's Hardware. He is a creative technologist and for seven years has created projects to educate and inspire minds both young and old. He has worked with the Raspberry Pi Foundation to write and deliver their teacher training program "Picademy".
-
WimBonner It would be really nice if this were updated to use the nmcli tool to configure network manager instead of manually configuring files since the latest versions of Debian are using Network Manager.Reply
